
Wow! I just realized I am swamped with stuff to do! Between vacations, Senate work, and photography work, my calendar is booked for awhile. Let's take a look:
July 12 - Wedding in Tampa
July 18 - Wedding in Port St. Joe
July 22 - Draft ART report to boss
July 23-31 - California
August 2 - Tentative engagement shoot in Tallahassee
August 6 - Jeremy's birthday
August 7 - Draft OGSR report to boss
August 15 - Tentative family photos in Apalachicola
August 19 - Draft OGSR report to boss
August 26 - Draft OGSR repor to chair
September 1 - Final OGSR report due
September 16 - Draft ART report to boss
September 17-29 - Europe!
September 19 - Wedding in St. George (I will be on pins and needles to see Catherine's photos!!)
October 12 - Draft ART report to boss
October 21 - My 3rd wedding anniversary!!
October 25 - Tentative maternity shoot
October 26 - Draft ART report to chair
November 1 - Final ART report due
Ok, that's it for now. Whew! It makes me tired just looking at it. Wish me luck friends!
Monday, June 29, 2009
Friday, June 26, 2009
The baking experience
So the other night I really wanted to make cookies. And not the kind you buy in the dairy section of Publix and then break apart and bake. No, I wanted to try cookies from scratch! (Ok, I'm not sure if they were technically from scratch. I mean, I didn't make the flour or anything. So what does it really mean to say you made something from scratch?? That should be a topic for another day). So my cookie experience began with picking Lacy Oatmeal Cookies out of the Mrs. Fields Best Ever Cookie Book! On a side note, this is a great book - so many cookies to choose from!
The last time I tried baking cookies - several years ago - they came out disasterous. Maybe it was because I almost put actual coffee grinds into the batter rather than instant coffee, which the recipe actually called for. I don't remember what else went wrong with that recipe, but needless to say, my dear husband told me "please, do not bake again." So I took his advice . . . until now. With all of the cooking I've been doing lately, I thought maybe it was about time to try my hand at baking again. Well, I did have some issues . . . but at least I didn't mess up the ingredients. That's a step up isn't it?! Ugh - maybe I'm just not cut out to bake!
Lacy Oatmeal Cookies
Yields 8 dozen
Ingredients:
1 cup quick oats (not instant)
1/4 cup all-purpose flour
1/2 teaspoon salt
1 1/2 teaspoons baking powder
1 cup granulated sugar (and this is why I don't make my own cookies - you have to actually see how bad they are for you!!!)
1 stick salted butter, softened
1 large egg
1 teaspoon vanilla extract
Directions:
1. Preheat oven to 325. Cover cookie sheet with foil, then coat with nonstick vegetable spray.
2. In a medium bowl, combine oats, flour, salt, and baking powder. Mix well with a wire whisk and set aside.

3. In a large bowl, combine sugar and butter with an electric mixer at medium speed to form a grainy paste. Add egg and vanilla, and beat until smooth. Add flour mixture and blend just until combined.


4. Drop dough by teaspoons onto cookie sheets, 2 1/2 inches apart. Bake for 9 to 12 minutes or until edges begin to turn golden brown. Let cool, then peel off cookies with your fingers.
**Um, ok, so here is the photo of my first batch. As you can see, they sort of spread together . . . like a cookie cake. I guess I put too many on the baking sheet at one time. Well, they may not look pretty, but they sure did taste good!

Here is my second batch - well, really my third batch. My second batch sort of burned a little - I put them in for 12 minutes. So this is my third batch, which was put in for only 9 minutes! I also only baked 5 cookies at a time so they wouldn't spread into each other. Perfecto!

5. Be sure to respray the cookie sheet between batches.
So I had some complications again. But, I think that with some more practice I may be able to nail this baking thing! They did turn out delicious!!!
A keeper!
OMG - this recipe is amazing! (If I do say so myself). But then again, I'm a slut for pasta! I highly recommend everyone try this dish. If you don't love it, well, then there is just something wrong with you!
Baked Orzo with Fontina and Peas
Ingredients:
2 cups chicken broth
1/2 pound orzo pasta
1 1/2 tablespoons butter
1/2 onion, chopped
4 oz mushrooms, sliced (I used portabella mushrooms, because as my friend Cass told me once, "Who actually uses the white mushrooms?!?")
1/2 cup Marsala wine or chicken stock (I used wine - um, hello! When a recipe calls for wine, YOU USE THE STINKIN' WINE!)
1/4 cup heavy cream or milk (I used heavy cream)
1/2 cup (2oz) shredded fontina (you can buy this in a block from the Publix deli, but you can use all mozzarella if can't find fontina. This is really yummy cheese, so I just bought 1/4 lb from the deli)
1/2 cup (2oz) mozzarella cheese, diced (I just used shredded cheese)
1/2 cup frozen peas, thawed
1/4 teaspoon salt
1/4 teaspoon pepper
1/4 cup bread crumbs
2 tablespoons grated parmesan
1/2 teaspoon dried thyme
Directions:
1. Preheat oven to 400 degrees. Coat an 8x8 baking dish with cooking spray.
2. Bring the chicken broth to a boil over medium-high heat in a medium saucepan. Add the orzo and cook until almost tender, about 7 minutes. Remove from heat and set aside.
3. Meanwhile, melt the butter over medium heat in a medium skillet. Add the onions and saute until tender, about 3 minutes. (I decided to use asparagus as well. I cut the asparagus into about 1 1/2 to 2 inch pieces and added them to the pan at this time and cooked for about 5 minutes). Add the mushrooms and continue to saute until the mushrooms are beginning to turn golden around the edges, about 7 minutes. Add the Marsala. Scrape the brown bits off the bottom of the pan and cook until the Marsala has reduced by half, about 5 minutes.
4. Add the orzo with broth to the mushroom mixture. Add the cream, fontina (I think I used a little more than 1/2 cup!), mozzarella, peas, (asparagus), salt, and pepper. Stir to combine. Pour the mixture into the prepared baking dish.
5. In a small bowl combine the bread crumbs, parmesan, and dried thyme. (I also melted a few tablespoons of butter and added it to the bread crumb mixture to make it sort of clumpy - this will make the top crunchier). Sprinkle the break crumb mixture on top of the pasta. Bake until golden, about 24 minutes.
Next time I will probably use more peas and asparagus to get a good dose of veggies! When this comes steaming out of the oven, your tastebuds will thank you!

A light chicken dish
It's summer time here in Florida, which means weather over 100 degrees and just about the same level of humidity. It is blistering hot! That usually means that when it comes time for dinner we don't want something straight out of the oven every night. Sometimes it's nice to have a refreshing dish. And this just happens to be that dish!
It's from Publix (Apron's Simple Meals), which just happens to produce some of my favorite recipes. Who would have thunk it?!
Chicken with Cream Bruschetta Pasta
Ingredients:
2-3 sprigs fresh basil rinsed (I used dried basil)
2 plum tomatoes rinsed (I used 3 - will explain later)
1 (8oz) package garlic/herb flavored spreadable cheese
1/2 cup reduced-fat milk
8 oz tomato trinity mix (fresh diced tomatoes, onions, bell peppers) (I did not use - again, will explain later)
3 chicken fillets (about 1 1/2 pounds)
1/4 teaspoon kosher salt
1 tablespoon canola oil (I used EVOO)
8 oz dry linguini pasta
Directions:
1. Fill large saucepan half full of water. Cover and bring to a boil on high for pasta.
2. Chop basil leaves coarsely. Cut tomatoes in small pieces. Place cheese in medium bowl; whisk in milk until smooth. (I didn't realize until I got home that the package of cheese I bought was only 4 oz. I highly recommend buying 8 oz because while we made due, you do need to use quite a bit of this sauce mixture over the top of the dish in order to make sure your pasta isn't dry.) Stir in tomatoes, basil, and tomato trinity mix; set aside. (Publix did not have the trinity mix when I was buying my ingredients, so I just bought an extra plum tomato and used that, then diced up some onion as well. I decided to skip using any bell pepper.)
3. Preheat large saute pan on medium-high 2-3 minutes. Season both sides of chicken with salt. Place oil in pan; swirl to coat. Add chicken; cook 4-5 minutes on each side or until golden. (If your chicken is thick, you may want to butterfly it in order to cook evenly. I didn't realize this at first and the outside got done much faster than the middle). Meanwhile, stir pasta into boiling water. Boil 10 minutes, stirring occasionally, or until tender.
4. Reduce heat on chicken to medium; cover and cook 5 more minutes or until internal temp reaches 165. Use a meat thermometer (I don't have one!)
5. Drain pasta. Remove chicken from heat; cut inot 1/2-inch thick slices. Arrange chicken over pasta and top with cheese mixture. Serve.
This was a pretty good dish; Jeremy really liked it. It was pretty refreshing because nothing is too warm. I would have liked it better with more cheese sauce on top, hence why you should remember to get 8 oz! But, I will definitely make this again!

Wednesday, June 17, 2009
Tangerine or Clementine?
As I was trudging through the grocery store yesterday, secretly wishing to have a personal grocery shopper so that I could go home after work and watch awesomely-'80s reruns of The Golden Girls rather than be stuck in a semi-frigid Publix, I spotted a crate of clementines. Well, right then and there my day was made. I know - it doesn't take a lot. But I really do love this little fruit. Unfortunately, I very rarely can find them at Publix. And no, tangerines are definitely not the same! They may look the same. Observe:
Tangerine:

Clementine:

But do not confuse the two (as I have done in the past). Let's go back a few months (or maybe years). I am enjoying a weekend at my parent's home in Pensacola. My dad is a big fruit person and they had all of these little "oranges" in a bowl. I had one and was immediately hooked. It was sweet, with just a hint of sour. Easy to peel. And best of all -no seeds! So when I came back to Tallahassee, I searched for my little piece of happiness in the produce section of Publix. I pick up several tangerines and put them in my cart. Now imagine my surprise - and ultimate sadness - when I got home and dove for one of these delicious fruits, only to find out that it wasn't what I ate in Pensacola. Needless to say, I was devastated. Ok, that may be a little dramatic. But I was pretty darn sad because now I had a bunch of tangerines that I really didn't want.
The thing about tangerines is that they have seeds. And I am adamontly opposed to seeds! I can't stand taking the time to pop them out of things! Take watermelon for example. Most people just flick the black seeds out and eat away. But not me. I can't stand the white seeds either! So eating watermelon is an entire afternoon of picking-out-seeds ordeal for me. Needless to say, I don't eat that much watermelon. Moving on. This is why clementines are so perfect: no seeds!
Eventually, I ask my mom what type of "orange" they had that fateful weekend and she solved the mystery for me. And ever since I have been on the hunt for clementines when I'm at the store. I don't get lucky that often. But yesterday the stars aligned and there was a crate of them. Right there. Calling my name. Who cares if I go out of town in 2 days. I HAD TO HAVE THEM! So I now have what appears to be 3 dozen clementines! I proceeded to eat 4 last night after dinner. And I have 2 for lunch. And I will probably eat another 2 as I cook dinner and then maybe another 4 after dinner. See a trend? I really do love them though. If you haven't had the opportunity to try a clementine, I really encourage you to do so. It's like a little burst of sunshine in your mouth!
Tuesday, June 16, 2009
Return of the '80s!
This past the weekend, the '80s came back to haunt us with full force. Let me just say how happy I am that we no longer live in this decade of big hair, blue eyeshadow, and shoulder pads! The amount of effort that goes into making your hair THAT big and THAT poofy should stay in the past. But we embraced this craziness with gusto this weekend - leggings and all! And it was worth it; if only for the awesome '80s tunes!
So the point behind this madness? Party4Purpose of course! Go to http://www.tallahasseeparty.org/ to get more information. And then start shopping for next year because these rad digs go fast! Next year I'm gunning for a prom dress! 


So the point behind this madness? Party4Purpose of course! Go to http://www.tallahasseeparty.org/ to get more information. And then start shopping for next year because these rad digs go fast! Next year I'm gunning for a prom dress!
**There are a lot of photos, but they were just so awesome I had to put them all! And yes, I definitely felt like I looked cuter than what showed up on these photos. Sad. But I guess that's what the '80s was all about!


Until next year . . .
Potato, Zucchini, and Carrot Pancakes
Or better known throughout this post as PZC Pancakes (it's just a lot easier to type!). What a name, huh? I know what you're probably thinking: "Pancakes with Zucchini and Carrot?!? Disgusting!" I know, because it's what I initially thought. I mean, this sounds REALLY gross doesn't it? Ok, to some of you weird foodies out there, maybe it sounds perfectly normal. But to us regular people who don't go looking for actual ginger root and rhubarb and all those other odds and ends, this recipe doesn't come off sounding all that appetizing. However, because I was feeling a little adventurous and because I just happened to have an extra zucchini lying around, I decided to give it a try. I was planning on making this for breakfast over the weekend, but ran out of time and it became a "breakfast for dinner" meal. Works perfectly fine both ways!
Anyway, here are the key players:
1 medium zucchini, 1 large carrot, 1 1/2 pound baking potatoes, flour, eggs, fresh/dried thyme, salt and pepper (because they ALWAYS come in a pair! You can't have one without the other, right?), canola oil, and spring greens.
Don't worry, I'll write it out for you later so you can easily copy and paste and then try this recipe at home. So, a few things first:
(a) I apologize for not having more photos
(b) I apologize for the quality of the photos - I just wasn't feeling it this night!
(c) I'm going to give you the recipe for the spring greens, but adding them is optional. And FYI - I did not make them and therefore my PZC Pancakes were minus spring greens and still turned out yummy!
Hmmm, I guess that's all. Ok, here we go.
The shredding is the hardest part about this recipe. And let me give you a hint: buy those pre-shredded carrots over in the produce section! You know - the kind you put on salads or in stir-fry. Trust me, it's much easier. I mean, first of all, unless you go around buying those bags of carrots, which let me tell you that I do not, then this recipe is hard. Because it calls for just one carrot. One. I mean, who buys just one carrot? No one - because "The Man" doesn't let you. He packages them up in bags where you are forced to buy at least 6 or 7 or 8. And because I just don't use carrots that often, that is a waste of money and good food. So, if you are like me, take my word for it and buy the pre-shredded carrots.
Ok, where were we? Yes, so shredding. This will be a lot easier if you have one of those handy dandy shredding devices. Which we just happened to have! I completely forgot about it and started doing my shredding using the cheese shredder (which, by the way, you can use it if you have to, but it's a lot harder!). Anyway, thank goodness for Jeremy! Because he remembered we had gotten this handy little mandolin (is that what it's called??? Isn't that some sort of guitar?? Oh well!) for our wedding. So we break it out for the first time (yes, it's almost been 3 years - shut it!) And this device was amazing! We just cut the potato (after peeling of course) in the little hand-holder thing with prongs and wha-la! You're set to shred! We used the "blade" that looks identical to the cheese grater (hence why I said you can get away with that if you want, but you won't have the awesome hand-holder!) Anyway, shred your potatoes and zucchini and then you already have your pre-shredded carrots (and after shredding the pototoes and zucchini, you'll thank me for having you buy those carrots already shredded! And if anyone ever finds pre-shredded zucchini and potatoes, please let me know!!).
Then you drain out the excess water in the zucchini - because it is very watery! I actually forgot this step. Oh wait! No, I didn't. But Jeremy was being so kind as to help me out by shredding and I forgot to tell him about this part and so he just piled up all the shredded potato and zucchini in one big pile. So I couldn't drain the zucchini. Oh well! It didn't really hurt the recipe, but I think I'd do it next time around. So then you put all the shredded stuff in a bowl and mix with the flour, egg, thyme, and the married couple - salt and pepper. Now, Jeremy thought the recipe was a little too thyme-y, so when I make it again, I think I may hold back a tad on the thyme. But by all means, make it to your personal taste preferences! You may love thyme! If that's the case just pour the whole bottle in there! (Ok, seriously, don't. Because then you'll hate this recipe and come back blaming me and that just won't do).

Moving on. Now you will take a handful of this mixture (about 1 cup) and press it onto a heated skillet (with oil). Make it as round as possible - you know, like a pancake! Cook for 4 to 5 minutes on each side and then transfer to a baking sheet (also covered in cooking spray). Then you will make an indentation in the pancake. You can use a wooden spoon or a measuring cup bottom. Pour an egg into the "nest" and place in oven, uncovered. Bake for 10-12 minutes or until eggs are cooked. Wha-la! PZC Pancakes!! Enjoy! (I even used a little bit of ketchup with mine, but that about made Jeremy gag. He doesn't believe ketchup should be anywhere near eggs. Weirdo.)

(picture before egg is cooked)
Ok, here's a copy and paste version of the recipe! Oh, I made this for only 2 people, which obviously changes some of the amounts of things you need. But I still used 1 zucchini and 1 cup carrots and the potatoes. It actually gave me just enough for 2 people, with only a little left over. But maybe my pancakes were bigger than the usual . . .
Potato, Zucchini, and Carrot Pancakes
4 servings
Ingredients:
Cooking spray
1 medium zucchini, shredded (about 1 1/4 cups)
1 large carrot, shredded (about 1 cup)
1 1/2 lb. baking potatoes, peeled and shredded (about 4 cups) (I bought one large potato and then one very small one and it was enough for 2 people)
1/4 cup all purpose flour
5 eggs
2 tsp chopped fresh thyme or 1/2 tsp dried thyme, crushed
1/2 tsp salt
1/4 tsp pepper
1 Tbsp canola oil (as usual, I used EVOO)
1 recipe spring greens (recipe below and optional)
Directions:
1. Preheat oven to 425. Lightly coat two small baking sheets with nonstick cooking spray. (make sure to use plenty because my pancakes did stick a little to the sheet).
2. Drain zucchini in a colander; press to squeeze out excess liquid. In large bowl, combine zucchini, potatoes, carrot, flour, 1 egg, thyme, salt, and pepper.
3. In extra-large nonstick skillet, heat half of the oil over medium heat (again, I used the entire amount of oil for only 2 - I didn't want them to stick). To make a pancake, spoon about 1 cup portion of potato mixture into skillet; evenly press and round edges wtih back of spatula. Cook 2 pancakes at a time, 4 to 5 minutes each side or until golden brown. Transfer to prepared baking sheet. Repeat.
4. With the back of a wooden spoon or 1/4 cup measuring cup, gently press each pancake, slightly off center to make a 3 inch diameter depression, deep enough to hold an egg. Pour 1 egg in each nest. Place pancakes with eggs in oven, being careful not to tilt baking sheet. Bake uncovered 10 to 12 minutes or until eggs are cooked through. Transfer to serving plates.
Spring Greens
In large bowl, combine 3 cups watercress and 1 small carrot, peeled and cut in long strips with vegetable peeler. For dressing, in bowl combine 2 tsp white wine vinegar, 1 tsp dijon mustard, 1/4 tsp salt, and a dash of pepper. Slowly whisk in 3 Tbsp olive oil. Serve with watercress and carrot strips.

Saturday, June 6, 2009
Tomato 'n' Beef Casserole
Unfortunately for the recipe, the night I made this I had filled my belly with cheese and crackers prior to dinner and, therefore, was not very hungry when it came time to eat. Which ended up making this dish less than appetizing for me. But, in the dish's defense, that was my fault for not eating lunch and being so hungry when I got home from work that I wanted to eat everything in sight! Jeremy on the other hand - who had not gorged himself on wheat thins and gruyere cheese - really enjoyed this casserole. And when I had it for leftovers the next day, it was pretty good!
Tomato 'n' Beef Casserole
Makes 6 servings
Ingredients:
1 tsp salt
1 cup plain yellow cornmeal
1/2 tsp Montreal steak seasoning
1 cup (4 oz) shredded sharp Cheddar cheese
1 lb. ground chuck (I used lean ground beef because it's all I buy!)
1 cup chopped onion
1 medium zucchini, cut in half lengthwise and sliced (about 2 cups)
1 Tbsp. olive oil
2 (14.5 oz) can petite diced tomatoes, drained
1 (6oz) can tomato paste
2 Tbsp. chopped fresh flat-leaf parsley (I did not use)
Directions:
1. Preheat oven to 350. Bring 3 cups water and 1 tsp salt to a boil in a 2 qt saucepan over medium high heat. Whisk in cornmeal; reduce heat to low and simmer, whisking constantly, 3 minutes or until thickened. (I poured all of the cornmeal in at once and it became very lumpy. I'm not sure if this is what was supposed to happen or not. You may try slowly adding the cornmeal to the water while whisking. However, lumpy cornmeal and all, this recipe still turned out good! So maybe the cornmeal is supposed to be lumpy . . . ?) Remove from heat, and stir in steak seasoning and 1/4 cup of the cheese. Spread cornmeal mixture into slightly greased 11x7 baking dish.
2. Brown ground chuck in a large non-stick skillet over medium-high heat, stirring often, 10 minutes or until meat crumbles and is no longer pink; drain and transfer to a bowl.
3. Saute onion and zucchini in hot oil in skillet (I used the same pan as I cooked the beef in) over medium heat 5 minutes or until crisp-tender. (Side note - what does "crisp-tender" even mean?? I mean, how is something crisp AND tender? I just don't understand this concept and yet, it is used all the time in recipes! Even the online-all-knowing-dictionary does not recognize this term! If someone could please explain it to me, I would be greatly appreciative!! Now, moving on . . .) Stir in beef, tomatoes, and tomato paste; simmer, stirring often, 10 minutes (FYI - there really wasn't anything to simmer per se. So I just let it all heat up for a few minutes - say 3 or 4 - and then moved to the next step). Pour beef mixture over cornmeal crust. Sprinkle with remaining 3/4 cup cheese (and you know me, I of course used more cheese! I think I put approximately 1 cup of cheese over the top. Mmm, Mmm Good!)
4. Bake at 350 for 30 minutes or until bubbly. Sprinkle casserole with parsley just before serving.
Sorry, the picture doesn't do it justice.

Tuesday, June 2, 2009
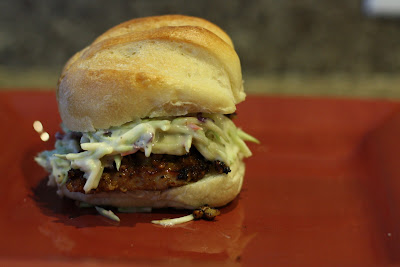
Pecan-Crusted Sliders
Do you ever get tired of the traditional hamburger? Yah, I do too. I mean, sometimes I want some yumminess on a bun, but I'm just not in the mood for a cow patty. So the other night I was in this mood and decided it was a perfect night to try this recipe. It turned out better than I could have imagined. I mean, who would have thought Wilbur would have made a good burger?! Anyway, if you want a change and are willing to walk on the wild side, these burgers are for you!
Pecan-Crusted Sliders
Makes 8 servings
*Because I did not use pork tenderloin, I was able to make only 2 - the perfect amount for me and the hubby!
Ingredients
12 oz pork tenderloin, sliced crosswise in 8 pieces (instead I bought pre-sliced pork pieces and it worked out great!)
1 egg
2 Tbsp honey
1 cup finely chopped pecans (I used those salad topper pecans - the ones that are roasted and glazed - Mmmm, yumminess in my mouth!)
2 Tbsp cooking oil
1 small green apple
1 1/2 cups shredded broccoli (broccoli slaw)
1/4 cup mayonnaise
8 small buns or dinner rolls
Dijon-style mustard (optional)
Directions
1. With palm of hand flatten pork sllices to 1/4 ince thickness. (I did not have to do because I bought the pre-sliced pork). In shallow dish whisk together egg and 1 Tbsp honey. In another shallow dish combine chopped nuts, 1 teaspoon salt, and 1/2 teaspoon pepper. Dip pork in egg mixture, then nut mixture, pressing to coat.


2. In 12-inch skillet heat oil over medium-high heat. Cook pork in hot oil 2-3 minutes per side, or until golden and slightly pink in centers.

3. Meanwhile, for slaw, quarter apple, remove core and seeds; thinly slice. In bowl, combine apple, shredded broccoli, mayonnaise, and 1 Tbsp honey. Season with salt and pepper.
4. Place pork on buns/rolls and top with slaw. Add mustard if you wish.
These really were delicious and I can't wait to try them again! Just look at this baby!

Penne with Shrimp, Zucchini, and Tomatoes
Because I had left over shrimp from my Baked Orzo recipe I decided that this would be a great new recipe to try. It was really easy to make, especially if you pre-cut things. It's perfect for a quick, weeknight meal. It was good too, although, it lacked a little taste. I am contemplating adding some feta cheese in (at the same time as the ricotta) the next time I make it. But I will definitely make it again!
Penne with Shrimp, Zucchini, and Tomatoes in Vodka Sauce
Makes 4 servings
Ingredients
Olive Oil
2 garlic cloves, minced
1/2 medium onion, finely chopped (I used probably 1/4 onion, which may have accounted for the lack of taste)
1 medium zucchini, quartered vertically and cut into thick slices
Kosher salt and course ground black pepper
1 cup vodka sauce
1 (14.5 oz) can diced tomatoes, undrained
8 oz penne pasta
8 oz (about 20) large shrimp, peeled and deveined
1/2 cup ricotta cheese
freshly grated Parmesan cheese

Directions
1. Heat olive oil in a large skillet over medium-high heat. Add garlic, saute until fragrant, about 30 seconds. Add onion, saute until just beginning to turn golden, 2-3 minutes. Turn heat to medium and add zucchini, season with salt and pepper. Continue to saute until onion and zucchini are cooked through, 3-5 minutes more. Add vodka sauce and diced tomatoes with juices, heat through.
2. Meanwhile, bring a medium pot of water to a boi.. Add penne and cook until al dente, about 10 minutes. During the last 3 minutes of cooking, add shrimp to pasta pot. Drain pasta and shrim. (My shrimp was already cooked, so I just added the shrimp with about 1 minute remaining in order to heat them).
3. Add pasta and shrimp to zucchini and sauce mixture. Add ricotta and gently mix all until combined. Serve with freshly grated parmesan cheese to taste.

Subscribe to:
Posts (Atom)